中文
ENGLISH
中文
ENGLISH
Developing and refining the advanced processes for its manufacturing and assembly operation is no small task for Irvine, CA-based Coast Composites, Inc.—a leading supplier of tooling for large, complex composite parts for the aerospace industry. That’s why when the company started looking for the next generation of technology, it went to a company known to think “big”: Verisurf Software, Inc.
“Some of the high-precision tooling we produce for customers is really huge, up to 100-feet long,” says Steve Anthony, Coast Composites IT manager. Size creates its own set of challenges and opportunities, and has also led Coast to its recent plant expansion from 85,000 sq. feet to over 200,000. Anthony notes, “When you build huge tooling you need lots of room.”
Even though the molds it produces are extremely large (typically 2 to 60 feet long), Coast still must meet precise tolerance requirements to satisfy its customers’ specifications. “We’re talking fine finishes and tolerances of four to five thou over a 50- to 60-foot length,” Anthony explains. “And, like any other QC requirement, we have to be able to prove to our customers that we have met or exceeded their specs. To do that has taken us into some interesting new technologies.”
Originally, company QC was accomplished using probes on their mills. “The problem was probing tied up our machines,” says Anthony. “We did in-process inspection, pulled the parts off to do final assembly, then put the assembly back on the machine to do final inspection. That was time consuming. We needed a better way to do it.” That better way turned out to be portable CMMs.

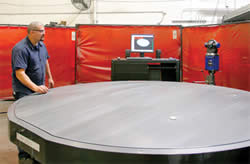
Real control and power came to Coast Composites’ process with the introduction of Verisurf software—a model-based manufacturing inspection solution that could interface with nearly any measurement metrology devices. Images courtesy of Coast Composites.
The Portable CMM Solution
“In a regular job shop, when a part is machined, you either check it on-machine using probing or you take it to a CMM somewhere,” he explains. “In our case, though, the parts are just too big to move. So, we figured out we had to bring the CMM to the parts. So, when the technology for portable CMMs became available, we jumped on it.” After investing in early generation portable laser tracker CMMs. Coast found the technology good, but not perfect.
“Laser trackers are a great concept,” says Anthony, “because they’re fast and accurate over very long distances. However in the beginning, the CAD software that drove those machines wasn’t very powerful. Today that problem has mostly been solved. We’ve been using laser trackers for several years—a major improvement, but still had drawbacks in its software capabilities.”
The Software Key
Real control and power came to Coast Composites’ process with the introduction of Verisurf software—a model-based manufacturing inspection solution that could interface with nearly any measurement metrology devices, including laser trackers.
“Verisurf actually sits on top of Mastercam, so it had all the import capabilities of Mastercam. Basically, when you buy Verisurf, you’re buying a seat of Mastercam, too, which provides a full suite of CAD modeling features—including solids, surfaces, wireframe and drafting, plus all the translators we needed for our customers’ CAD platforms. But the main thing was that Verisurf made those laser trackers do everything they’re mechanically capable of doing. Each customer requires different reporting. Verisurf has an HTML-based report format that you can customize—including raw point data,” states Anthony.
Primer: Offline Inspection
For most of its projects, Coast receives a solid model of the component, including the critical dimensions and inspection points.
“For QA purposes, we import the solid model into Verisurf, and then our guys move the laser tracker reflective mirror to collect all the points that have to be verified. They push a button on their pendant and Verisurf records the point, or they can scan thousands of points to get a point cloud in a given area. Either way, Verisurf records it all and compares the data against the model. If there’s a problem, it lets the operator know immediately.

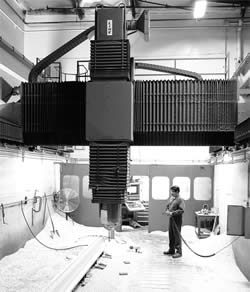
Size creates its own set of challenges and opportunities, and has led Coast to a recent plant expansion from 85,000 sq. feet to over 200,000.
“When you’re inspecting really huge projects, the operator can get too far from the PC monitor to read it, so Verisurf has come up with the ability to transmit the data via wireless to a PDA device, so now the operator can look at his PDA and see what’s happening,” notes Anthony.
Find More Uses
Coast also uses the Verisurf and laser tracker combo during mold assembly. “The system works perfectly to help us locate points on the mold for brackets, holes, etc.,” Anthony explains. “The model tells you where it wants a hole or a part to be assembled. The operator moves the little mirror to find the exact location on the assembly. He marks the spot and he’s done.”
Coast also uses the Verisurf/laser tracker portable system at customer sites to help set up molds. “We use them for leveling, dimensioning and inspection,” he says. “The whole setup consists of the laser tracker and a PC on wheels. It’s very portable.”
Making Offline Inspection Positive
Coast Composites has seen significant benefits since it began using Verisurf with its laser trackers. Anthony states, “The offline system speeds up our manufacturing process by eliminating the need for on-machine inspection; and, it greatly speeds the mold assembly process by allowing us to quickly locate holes and components and level the molds. Also our customers make a lot of revisions that Verisurf can read and then give us the new data we need for checking. I really can’t put a number on our savings, but it has been significant. It can easily equate to weeks in terms of faster throughput.”
The bottom line from Coast’s perspective: “Offline inspection with Verisurf and the laser tracker has allowed us to perform all the QA tasks we need to do to make our customers happy.”


